Detecting and Handling Proxy/VPN/Abusive IP Addresses in Your Flutter Application
In order to cut down on adverse behavior, you may want to detect and restrict proxy/VPN/abusive IP addresses from having the ability to do certain actions within your application.
I’ll show you how to implement restrictions for these types of IP addresses in Flutter using three different APIs: IP Intelligence, IP Hunter. and Project Honey Pot.
I will be changing the IP address of the emulator device to simulate different users with different IP addresses using the application.
These APIs are not specific to Flutter so you can use any language and implement them the same way in that language’s syntax as long as they support HTTP/DNS queries.
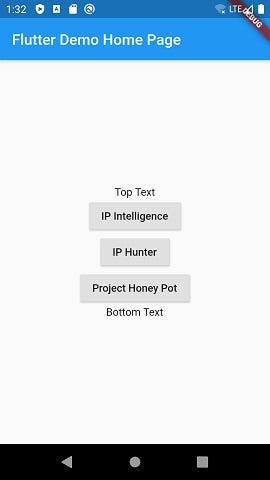
Here is the final demonstration in action:

IP Intelligence and IP Hunter detect IP addresses that belong to proxies/VPNs. Project Honey Pot determines if an IP address has been known to be abusive throughout their Honey Pot network.
We will create a basic Flutter application that you can modify for your own needs. There will be three buttons corresponding to the three APIs we will use. When you click each button, they will run the device’s IP address through that service and return a result of whether it is an IP in good standing or one that you may want to block. For your application, you may only need one of these APIs for your purposes, but I’m demonstrating all three since they all work slightly differently.
In case you want to follow along and change your IP address in your Android emulator device:
- Open “Settings” in the Android device
- Select “Network & Internet”
- Select “Wi-Fi” (should be at the top)
- Select the Wi-Fi name (should be “AndroidWifi”)
- Select the edit button in the top AppBar (the pencil icon)
- On the new dialog screen, select “Advanced Options” and then scroll down to where it says “IP Settings.” DHCP is probably selected by default, so select that and change it to “Static”
- Enter a new IP address (can just be random numbers that match the format) in the four dot notation and then select “Save”
The device will not use the new IP to access the Internet (it uses your host PC’s IP for that), but the new IP will show up as the device’s IP during testing.
Setting up
I’m using Android Studio 3.6.3 for this tutorial, but any other IDE with Flutter should work just as well.
First, let’s create a new Flutter project:
- Open Android Studio and select “File” -> “New” -> “New Flutter Project”
- Select “Flutter Application” and click “Next”
- Enter a Project name and Project location (mine is called “flutter_proxy_check”). Click “Next”
- Enter the package name. I’m just leaving it to the default “com.example.flutterproxycheck” Click “Finish”
Your new project will open with the boilerplate Flutter application code.
Open your emulator or connect to your physical device. Once you do that, click “Run” to see the basic application appear to ensure it is working correctly.

Now your basic app is working (hopefully), so now we can import the libraries we need to work with the APIs. We will need:
- Material : should already be imported on project creation
- Convert : for JSON
- get_ip : for getting the IP address of the device
- http : for making an HTTP GET request to check the IP of the device
- dns : (Project Honey Pot only) — for making DNS queries
Don’t forget to update your pubspec.yaml file to include the dependencies for http, get_ip, and dns:

Also, make sure to install the dependencies once you add them to the pubspec.yaml file.
Now that we have our imports, let’s add the three buttons and two Text widgets to our UI in addition to removing what we don’t need.
Reformatting the UI
In the _MyHomePageStateclass, I'm taking out the _incrementCounter method, the _counter int variable, and the FloatingActionButton. I'm adding three RaisedButtons and relabeling them to correspond to our APIs. I'm leaving the onPressed callbacks empty right now but will get to those shortly. Put a Text widget before the first button and after the last button too.
We will also create three new async methods within the _MyHomePageState class that will be called when their buttons are clicked. They need to be async because the IP operations we will have them conduct will return Futures (since contacting the Internet for a value will have some delay).
Your new _MyHomePageState class should look like this:
Everything else can stay the same as it was when you made the new project.
When you reload the app, it should look like this:
We will now have the app get the device’s IP address on start so it can be referenced by all three API methods.
First, we will create an empty String variable within _MyHomePageState called _currentIP
String _currentIP = “”;
Let’s also make another empty String variable for a Text display we will use:
String _resultText = “”;
Replace the Text widget containing “Bottom Text” with _resultText. I’m going to increase the font size of it as well.
Text(
 _resultText,
 style: TextStyle(fontSize: 20.0),
 )
We will then create a new async method within the _MyHomePageState class called _getCurrentIP. In this, we will use the get_ip package to get the IP of the device and then call setState to update the _currentIP variable we declared.
_getCurrentIP() async {
   // Uses the get_ip package to get the IP address of the device
   String ip = await GetIp.ipAddress;
   // Set state to update _currentIP
   setState(() {
     _currentIP = ip;
   });
 }
We want the application to get the IP address at start, so we will create an initState and call _getCurrentIP from there:
@override
void initState() {
super.initState();
_getCurrentIP();
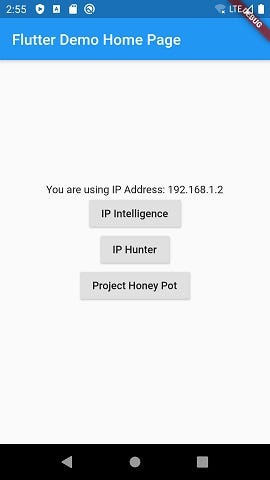
}One last thing we will do is change the “Top Text” Text widget to display our current IP address (_currentIP) using a ternary operator depending on what its content contains.
Your _MyHomePageState should now look like this:
Now we can start with implementing the APIs. I recommend you at least follow along with the IP Intelligence example first to get a grasp of how it operates.
Keep in mind that these databases are being updated constantly, so the status of an IP address one day may differ the next.
Wiring in the APIs
IP Intelligence
API Documentation: https://getipintel.net/free-proxy-vpn-tor-detection-api/
Pricing: Free (maximum of 15 queries/minute, with a 500/day maximum). Paid options are also available (generally $1.25 per 1000 queries or you can purchase bundles that drop that price down).
IP Intelligence is easy to integrate in your application — all you need is a valid email address.
Syntax: http://check.getipintel.net/check.php?ip=IPHere&contact=SomeEmailAddressHere
That’s about it. We just have to add in the IP address and our email address. We are also going to add in an optional flag, so the full URL will be:
http://check.getipintel.net/check.php?ip=IPHere&contact=SomeEmailAddressHere&flags=m
In short, the “flags” parameter can change the results depending on what you are looking to do. The “m” flag will allow a result of either 0 (good IP) or 1 (bad IP), unless an error occurs. IP Intelligence can also return a value between 0 and 1 if you want, but it’s better for you to read the documentation to see how it all works.
I’m going to add the above URL into the _getIPIntel method and use interpolation to set the variables within the URL, so we will make a variable for our email address as well.
Modify your _getIPIntel method like this (with your own email address):
Now we have to go to our onPressed callback in the IP Intelligence button and add a few things:
We are making the onPressed callback async to wait for the return of _getIPIntel until continuing. We are assigning it to a bool, where, if _getIPIntel returns true, will allow the IP. If it is returned false, the IP is to be blocked. Both conditions will change the _resultText to show what the determination is.
This is what the _MyHomePageState class looks like now (you’ll see I added the same logic for all of the onPressed callbacks):
After we hot restart, you should see the following:
I’ll be using two IP addresses to simulate two different users. They are both proxy IPs found on the public proxy website US-Proxy.org.
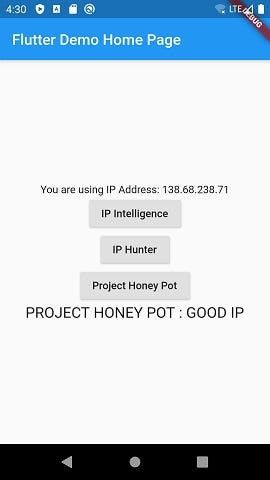
138.68.238.71
180.250.12.19
I’ll change my IP in the emulator to the 138.68.238.71 address first. Now when we click the “IP Intelligence” button, it will call the _getIntelIP method, which will take the current IP and send it through its API, and return either a 0 (good) or 1 (bad), and the _resultText will update with the results:
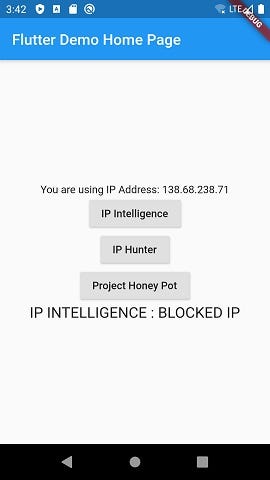
We were told that the IP address is not good, so it should be blocked and not permitted to do whatever you want to restrict.
I’ll change my IP to the 180.250.12.19 address now on the emulator, hot restart the app, and check again.
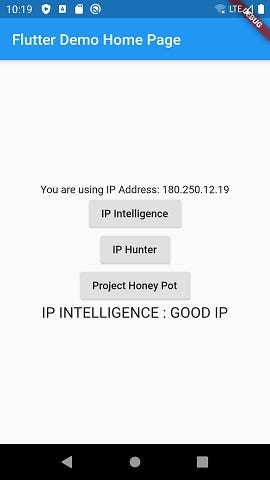
As you see, IP Intelligence found this IP to be safe and returned it as “0” (true).
_____
IP Hunter
API Documentation: https://www.iphunter.info/api
Pricing: Allows for a 15-day free trial with 1,000 requests/day with no per minute limit. Tiered pricing plans start at €3.99/month for 60,000 requests/day with no limit/second.
IP Hunter is similar to IP Intelligence, but you need to register and obtain an API key.
To register, go to https://www.iphunter.info/prices and click on the “Free Subscription” button.
Once you register and verify your account via email, click on “My Account” and under the “Subscriptions” heading you’ll see your free plan listed. Click on that and you’ll be taken to your API key.
If no error occurs, IP Hunter will return 0 (good IP), 1 (bad IP), or 2 (unknown status IP). In our case, we will just be concerned if the result is 0 or not.
Back to the code, head to the _getIPHunter method we created earlier and create a String for your API and paste it in. Also, create a string for IP Hunter’s API call:
String ipHuntKey = "<APIKEY>";
String ipHuntAPI = "https://www.iphunter.info:8082/v1/ip/ENTER_IP_HERE";
If you followed along with the IP Intelligence example, working with this API is slightly different. We still use an http.get request, but this time we have to pass in some headers:
final response = await http.get(
     ipHuntAPI,
     headers:{
       "X-Key" : ipHuntKey,
     },
   );
 }
Now we just have to change the ipHuntAPI String to include our _currentIP and also decode the response.body we get back, as it will be in JSON format. We will then get the ‘block’ information from the ‘data’ set, which will be our number value:
If you didn’t set up the onPressed callback yet, scroll up to the IP Intelligence example and copy/paste it from there.
Hot restart and then click the “IP Hunter” button in your app. Using the first proxy IP from the IP Intelligence example (138.68.238.71), I get the following result:

Just as IP Intelligence did, IP Hunter detected that the IP was likely a proxy so a “0” was not returned.
I’ll change IP addresses to the second proxy IP from the IP Intelligence example (180.250.12.19) and try it again to get a good IP determination:

_____
Project Honey Pot
API Documentation: https://www.projecthoneypot.org/httpbl_api.php
Pricing: Free
Project Honey Pot checks your IP query against their records collated from a network of decoy web pages to determine if a specific IP address has engaged in suspicious behavior. This process is referred to as checking the “HTTP Blacklist” or “http:BL” for short.
Setting up a Project Honey Pot API requires a bit of more work, but is not difficult overall. You will need to register and get an API key to use.
First, you need to register with Project Honey Pot at https://www.projecthoneypot.org/create_account.php
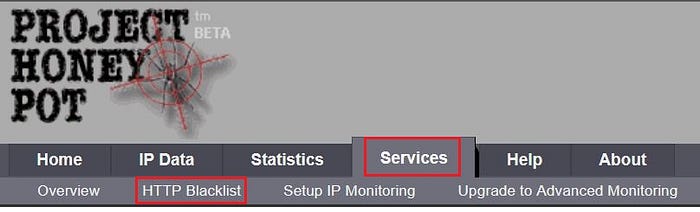
Once you register and login, click on the “Services” tab and then “HTTP Blacklist” below it.
Copy your API key from there and head to your code in the _getHoneyPot method and put that API key in a String variable:
String honeyPotKey = "yourKeyHere.";I recommend you add a trailing period at the end of your key to help with concatenation here in a second.
Create another String for the URL:
String honeyPotAPI = ".dnsbl.httpbl.org";Now comes the creative part…
This is how we have to send the IP to Project Honey Pot:

We have to reverse the IP address in order to send it through Project Honey Pot’s API. We can do this in one line by making a new String variable:
String finalIP = _currentIP.split('.').reversed.join(".");This will take the _currentIP variable, split it at its periods, reverse that list of the numbers, and then join them all again with a period.
So an IP of 7.8.9.10 would be reversed to 10.9.8.7, for example.
Now we will concatenate our three variables (honeyPotKey, finalIP, and honeyPotAPI) to build the format described above.
String finalURL = honeyPotKey + finalIP + honeyPotAPI;
// Translates to:
// APIKEY.REVERSEDIP.dnsbl.httpbl.org
If you didn’t add a trailing period at the end of your API key String or at the front of your API URL String, you will have to add them in between those variables.
Now we can use the DNS package to make a Google DNS call and pass in our URL:
final client = HttpDnsClient.google();
final result = await client.lookup(finalURL);
Jumping ahead for a second, when result is printed, we will get back what appears to be another IP address:

Now, we have to decode this a bit to know what it means:
The first octet (127) will always be 127 on every value returned, so ignore that.
The second octet (1) represents the number of days since last activity. This ranges from 0–255, which shows you how active this particular IP has been hitting the Honey Pot network.
The third octet (62) indicates a threat score. This ranges from 0–255, with 0 indicating no threat score and 255 being extremely threatening. This number is calculated by how much damage the IP address has done, among other factors, on the Honey Pot network (see the documentation for more explanation).
The fourth octet (1) indicates the type of visitor that IP address has currently been assigned:
0 = Search Engine, 1 = Suspicious, 2 = Harvester, 4 = Comment Spammer
Given everything here, you can decide what octets you want to pay attention to and what ones you can ignore.
If you are looking for a quick determination, using a threshold for the third octet may suit your needs. To do this you would just take the result, split it, and then return the second index.
In our example, I’m just going to pay attention to octet 3 and set a threshold to determine if the IP address is bad or not.
If the IP you query has no records within Project Honey Pot’s database, it will return a “non-result,” which means the IP is clean. You can detect this by checking for its length (0 will be a non-result, 1 would be a result). In this example, if a result is returned, I will get the response, convert it to a string, split it at the periods, grab index 2, convert it to an integer, and then use that integer for the threshold:
If you didn’t set up the onPressed callback yet, scroll up to the IP Intelligence example and copy/paste it from there.
I changed the IP back to the 138.68.238.71 address we used in the above examples, hot restarted, and clicked on the “Project Honey Pot” button to get the following result:
No result was returned, so the IP has been cleared to continue.
Now I changed the device’s IP to the 180.250.12.19 address, hot restarted, and clicked it again to get the following:

Project Honey Pot blocked the IP because the threat level (octet 3) was above our threshold, which was set to anything greater than 30.
Summary
Remember that checking for a proxy/VPN IP is not the same as checking for an abusive IP, as you saw that the two proxy checkers (IP Intelligence/IP Hunter) would block one IP (138.68.238.71) while the abuse IP checker (Honey Pot) would allow it. And with the second IP (180.250.12.19), the two proxy checkers would allow it while Honey Pot would not.
Final notes: If you are trying to implement any of these methods within a validator for a TextFormField, be aware that, as of this writing, async calls are not permitted. This means that you cannot use any of the above techniques to check for the IP in your validator itself. There are a couple of workarounds for this:
1. If you have a button to press (such as a “Submit” button to send text to a database), call the async method(s) in your onPressed callback as we did in this tutorial and prevent the text submission from completing if the IP is rejected.
2. You can use the flutter_form_bloc package.
3. You can use the modal_progress_hud package.
I have not tried methods 2 or 3 so I cannot speak for them, but they should be worth a look if you are interested in implementing anything from this article in TextFormFields with validators.
Also, make sure to implement some error handling while dealing with HTTP requests, such as using statusCode to check for connection status before trying to handle a return. Check here for an example of that.
Finally, you should not store any secret API key in the code of a production build. Check here for a guide regarding this issue.
Disclaimer: Do not abuse any of the APIs or IP addresses that I referenced in this article.
Here is the full code: